Input prompts
Table of contents
- Introduction
- General setup
- Getting input prompt strings
- Keeping the input prompt up-to-date
- An example implementation
- Controlling the displayed controller icons
- Controlling the display of mixed inputs
- Customizing the style of the input prompt icons
Introduction
Input prompts like “press A to jump” tell your player how to control your game while being in the game. Showing input prompts is a great usability feature which will make it easy for your players to understand how to play your game. Therefore G.U.I.D.E provides a way to display input prompts in your game based on your configured actions.
G.U.I.D.E itself does not mandate a specific way to display input prompts. Instead, you can use the built-in GUIDEInputFormatter class to build an input prompt string for any given action. You can then display this string in your game’s user interface in any way you like. GUIDEInputFormatter can generate two kinds of input prompt strings:
- Pure text strings, which are suitable for displaying input prompts as text.
- Rich text strings, which are suitable for displaying input prompts as icons. These are intended to be used with Godot’s
RichTextLabelcontrol.
General setup
Before you can get strings from GUIDEInputFormatter, you first need to get an instance of the GUIDEInputFormatter class. There are two ways to do this:
- You can get an instance of
GUIDEInputFormatterwith theGUIDEInputFormatter.for_active_contexts()factory method. This will return a formatter that will use the action mappings of all currently active mapping contexts. It will automatically keep track of changes to the active contexts, so you don’t need to worry about updating the formatter when the active contexts change. - You can also create a formatter for a specific mapping context by calling
GUIDEInputFormatter.for_context(context). This will create a formatter that uses the action mappings of the specified context. This is mainly useful if you want to display input prompts in a key binding dialog where you want to show the prompts for a specific context.
Getting input prompt strings
Once you have an instance of GUIDEInputFormatter, you can use it to get input prompt strings for your actions. The GUIDEInputFormatter class provides multiple different methods to get input prompt strings. The simplest one is action_as_text which returns a text string for a given action
# The action for which we want to get the input prompt.
@export var jump_action:GUIDEAction

# The formatter that we will use to get the input prompt string.
var _formatter:GUIDEInputFormatter = GUIDEInputFormatter.for_active_contexts()

# An example function that updates a label with the input prompt string for the jump action.
func update_prompt_label():
    var action_text:String = _formatter.action_as_text(jump_action)

    $Label.text = tr("%s to jump") % [action_text]
The returned text will be a human-readable string that describes the input for the given action. For example, if the action is mapped to the A button on an XBox gamepad, the returned string will be A. If the action is mapped to the Space key on the keyboard, the returned string will be [Space]. The returned string will automatically reflect the actual input device being currently used, so you don’t need to worry about displaying the correct input prompt for the player’s input device.
Note, that the returned string may contain more than one input, if an action is mapped to multiple inputs. For example if an action is mapped to the W, S, A, and D keys on the keyboard, the returned string will be [W], [S], [A], [D]. Similar if the mapping is using a combo modifier, the returned string will be the combo, e.g. A > B > A > X > Y. If the action is mapped using chorded input, the returned string will be the chord, e.g. LT + A.
Also note, that the returned string will not contain a description of the action itself, only the input prompt. This is why in the example above we add the action description manually. GUIDEInputFormatter will automatically feed the input description through Godot’s tr function so you can properly localize the prompt if desired.
Rich text strings
If you want to display input prompts as icons, you can use the action_as_richtext_async method. This method returns a BBCode string that can be directly fed into Godot’s RichTextLabel control. It is important to know that the GUIDEInputFormatter will create these icons on the fly because there is quite a big amount of potential icons to be made (e.g. keyboard keys have labels in all kinds of different languages, so creating all possible icons beforehand really is not feasible). This means that this method may not return immediately but may take a frame or two to complete. You must therefore call this method asynchronously and update the RichTextLabel when the string is ready. Here is an example of how to use this method:
func update_prompt_label():
    # Note that we use `await` here to wait for the result of the async method.
    var action_text:String = await _formatter.action_as_richtext_async(jump_action)


    $RichTextLabel.parse_bbcode(tr("%s to [b]jump[/b]") % [action_text])
Keeping the input prompt up-to-date
When mapping contexts change, the player re-binds an input or joypads get connected and disconnected you will need to update the input prompt strings. G.U.I.D.E provides a signal to which your UI can subscribe to get notified when the input prompt strings need to be updated:
func _ready():
    # Subscribe to the input_mappings_changed signal to get notified when the input mappings change.
    GUIDE.input_mappings_changed.connect(_on_input_mappings_changed)

func _on_input_mappings_changed():
    # Update the prompt labels with the new input prompt strings.
    ...
An example implementation
All examples that come with G.U.I.D.E use a shared RichTextLabel to display the input prompts. This label has an instructions_text property that describes the actions that the player can perform. In a second actions property, the actual GUIDEAction objects are stored.
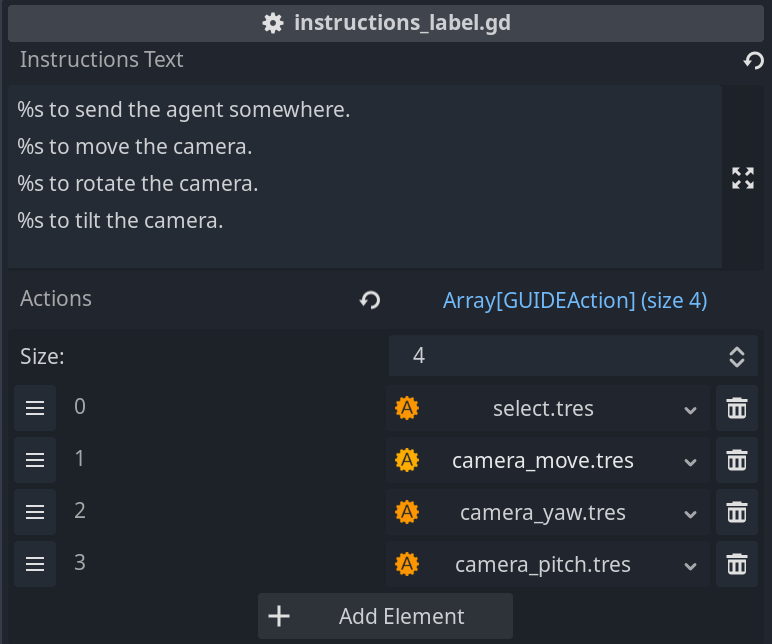
At runtime, the label will use the GUIDEInputFormatter to generate the input prompt strings for these actions and display them in the label.
The label will automatically update the input prompt strings when the input mappings change. This is not the only way to display input prompts, but it is a simple and effective way to do so and you can easily adapt it to your needs or use it as a starting point for your own implementation. You can find the full implementation of the input prompt label in the example projects that come with G.U.I.D.E at guide_examples/shared/instructions_label.gd.
Controlling the displayed controller icons
When the player has connected a controller, you usually want to match the icons that are displayed on screen to the controller type that the player is using. G.U.I.D.E automatically tries to detect the type of controller that is connected and will show icons matching the general type of controller. So if the player uses a PlayStation controller, they will see PlayStation icons, and if they use an Xbox controller, they will see Xbox icons.
Sometimes it is not possible to properly detect the controller type. This is very often the case with off-brand controllers that just register as a generic controller to the operating system and have no useful detection strings that can identify them. This is also the case for web builds, where the browser hides the controller name from Godot and therefore Godot (and G.U.I.D.E) has no way to auto-detect the controller.
In these cases, G.U.I.D.E will by default show generic icons that will not match what is printed on the buttons of the controller. This is not a great user experience. Therefore, the input prompt system allows you to override which controller icons are displayed depending on a set of rules:
var _formatter: GUIDEInputFormatter = GUIDEInputFormatter.new()

# Instruct the formatter to detect the controller type and format the icons accordingly.
# If the controller type cannot be detected, the formatter will use generic icons instead.
# This is the default behavior.
_formatter.formatting_options.joy_rendering = GUIDEInputFormattingOptions.JoyRendering.DEFAULT

# Instruct the formatter to detect the controller type. If the controller type
# cannot be detected, tell the formatter to use a specific controller type instead.
_formatter.formatting_options.joy_rendering = GUIDEInputFormattingOptions.JoyRendering.PREFER_JOY_TYPE
# In this case, tell the formatter to use the Microsoft controller type as fallback.
_formatter.formatting_options.preferred_joy_type = GUIDEInputFormattingOptions.JoyType.MICROSOFT_CONTROLLER

# Instruct the formatter to skip controller type detection and always use a specific
# set of icons.
_formatter.formatting_options.joy_rendering = GUIDEInputFormattingOptions.JoyRendering.FORCE_JOY_TYPE
# In this case, tell the formatter to use Sony controller icons, always.
_formatter.formatting_options.preferred_joy_type = GUIDEInputFormattingOptions.JoyType.SONY_CONTROLLER
You can find an example of how to use this feature in the input_prompts example that ships with G.U.I.D.E.
Controlling the display of mixed inputs
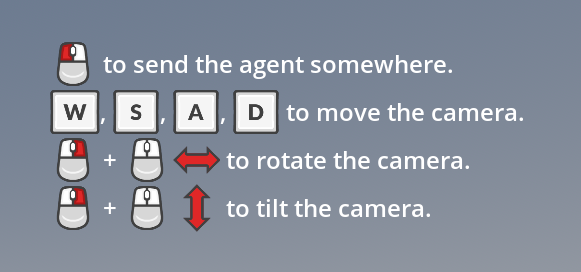
In simple setups, it is quite common to just create an action and bind this action to multiple different inputs from different input devices. For example, this action is bound to the right mouse button, the Ctrl key on the keyboard, and the A button of a controller:

If you create a string for this action, you will get something like this:
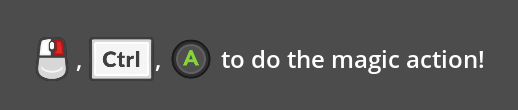
Now, depending on your intent, this may or may not be what you would like to have. For example, if the player is free to change their input device at any time, you may want to only show the binding that matches the input device that the player has last used. To achieve this, you can set a filter in the input formatting options, that controls what kind of input is shown. The filter is a Callable which receives a formatting context and returns a boolean value:
# Tell the formatter to only render inputs related to the mouse and keyboard:
_formatter.formatting_options.input_filter = \
    func (context:GUIDEInputFormatter.FormattingContext):
        # context.input holds the input that we're about to format
        # this is a GUIDEInput object.
        # we use the device_type property of GUIDEInput to check
        # if the input is related to the mouse or the keyboard.
        return context.input.device_type & \
            (GUIDEInput.DeviceType.MOUSE | GUIDEInput.DeviceType.KEYBOARD) > 0


# Tell the formatter to only render inputs related to joysticks/controllers:
_formatter.formatting_options.input_filter = \
    func (context:GUIDEInputFormatter.FormattingContext):
        return context.input.device_type & GUIDEInput.DeviceType.JOY > 0


# Tell the formatter to render all inputs:
_formatter.formatting_options.input_filter = \
    # this is the default filter,
    GUIDEInputFormattingOptions.INPUT_FILTER_SHOW_ALL
You can find an example of how to use this feature in the input_prompts example that ships with G.U.I.D.E. This example also has code to detect when the player changes their input device and update the input prompt strings accordingly.
Customizing the style of the input prompt icons
G.U.I.D.E ships with a variety of renderers that can produce icons for all supported inputs. These renderers come with a built-in icon set that is good enough for prototyping or simple games where you don’t have any specific needs to match the icons to the theme of your game. If you want to match the icons to your game, you have two options:
- You can create a style for each renderer of G.U.I.D.E and apply this style when the game starts.
- You can create a custom renderer that gives you complete freedom over how the icons are rendered.
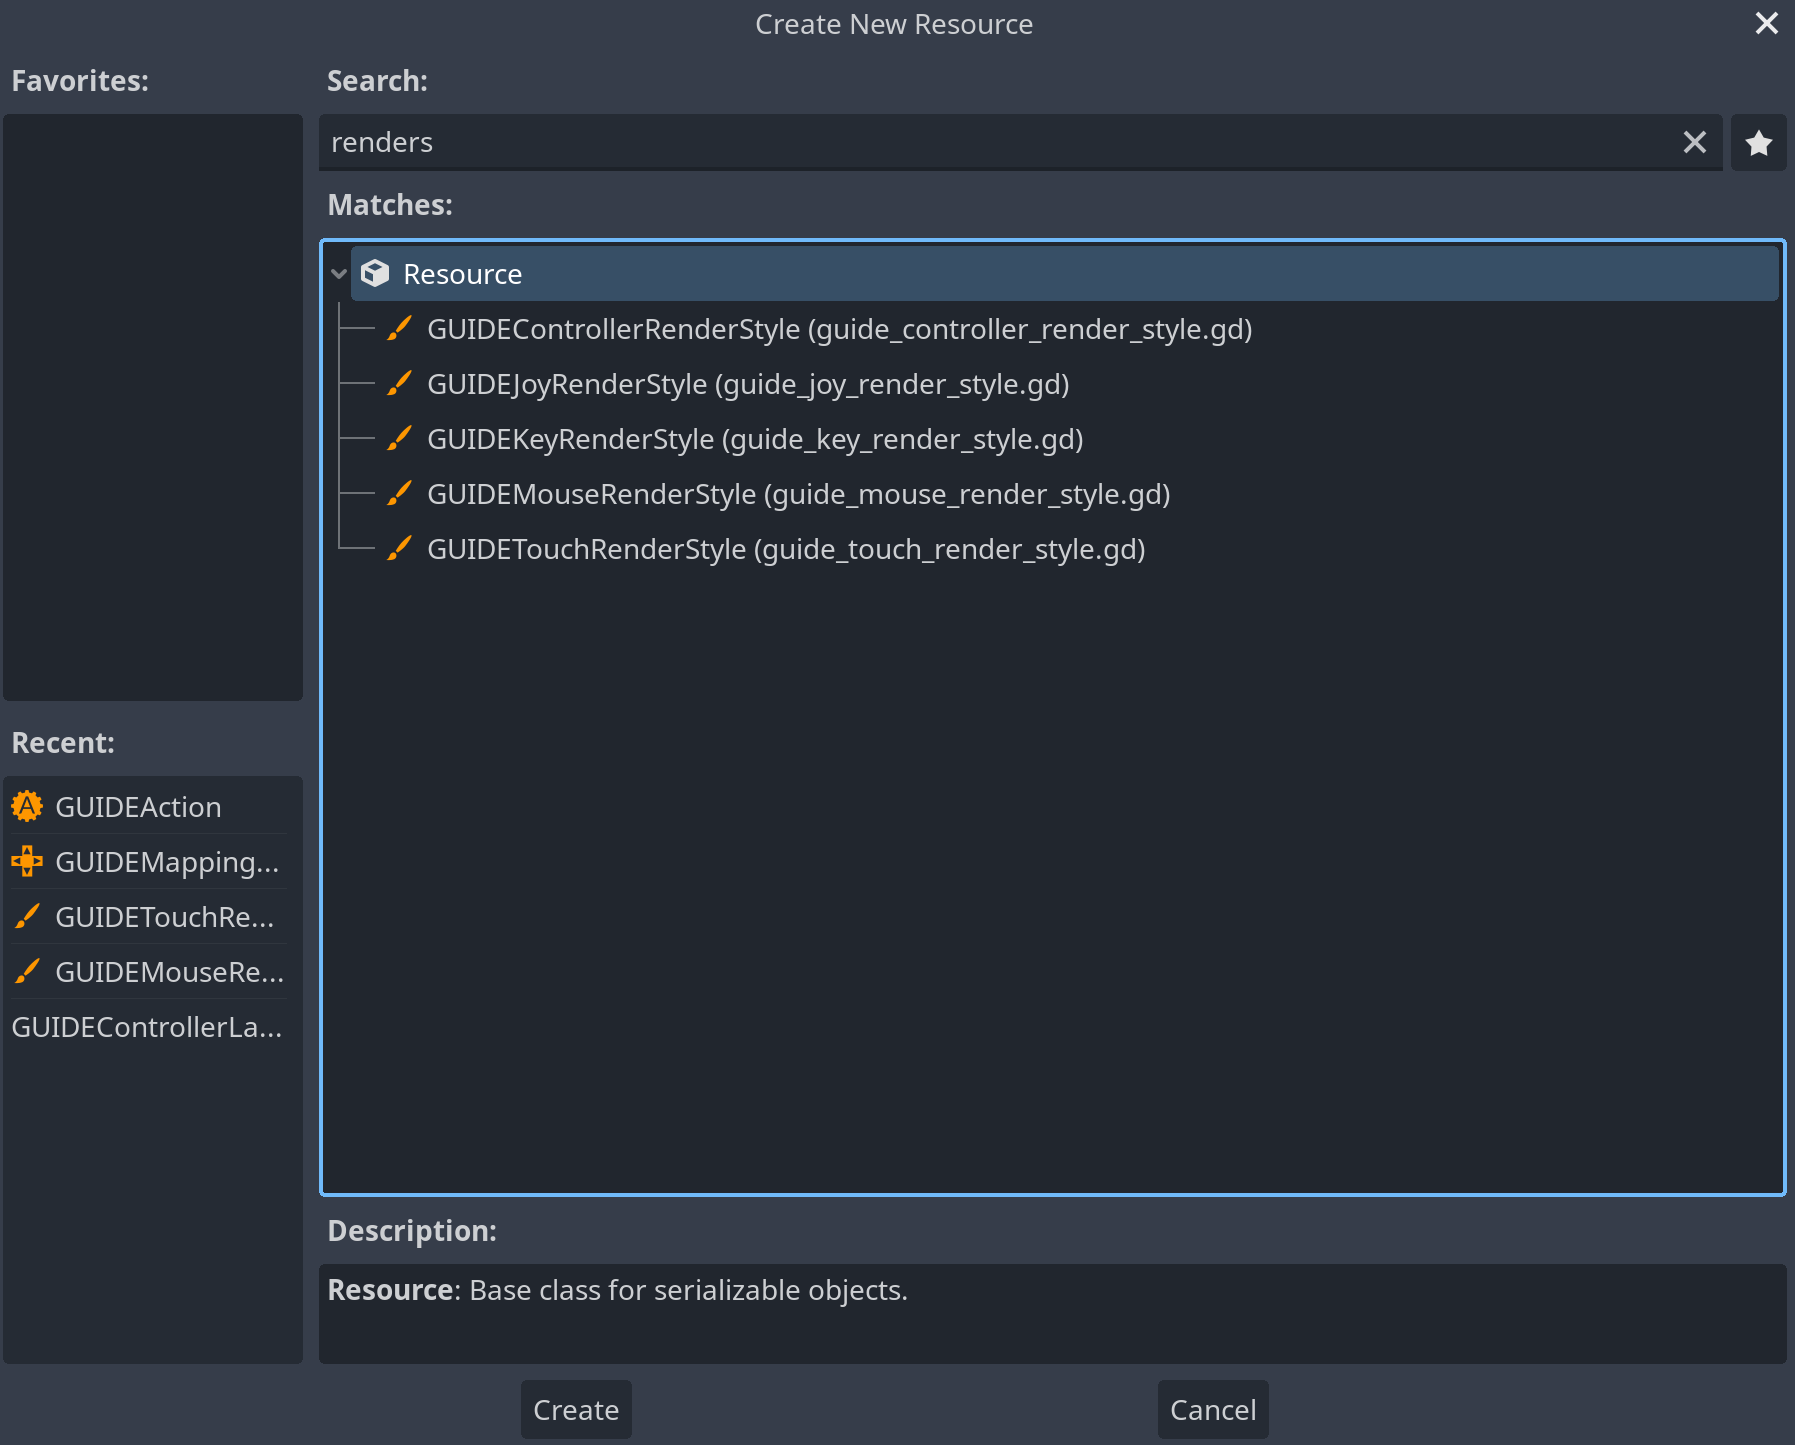
Creating a style for each renderer
Render styles are simply resources, so you can create them by right-clicking in the folder structure and then selecting Create New… > Resource. Search for RenderStyle in the search bar and then pick the style you want to create:
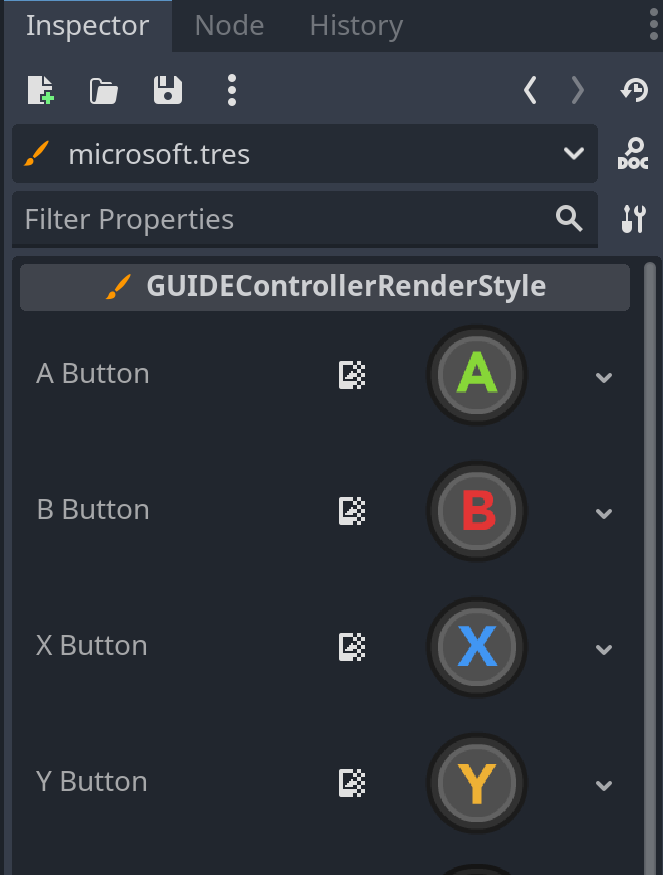
Once you have created the style, you can double-click it and edit it in the inspector. Most styles will only allow you to change the icons for something else, but some styles like the key renderer style also allow you to change other aspects, like the font and the color of the key labels.
Once you have created and customized your render style, you can register it with G.U.I.D.E, and G.U.I.D.E will use your style over the built-in one. This can be done with one line of code.
# For joy render styles:
GUIDEJoyRenderer.set_style(load("res://my_joy_render_style.tres"))

# For keyboard render styles:
GUIDEKeyRenderer.set_style(load("res://my_keyboard_render_style.tres"))

# For mouse render styles:
GUIDEMouseRenderer.set_style(load("res://my_mouse_render_style.tres"))

# For touch render styles:
GUIDETouchRenderer.set_style(load("res://my_touch_render_style.tres"))

# For controller render styles, you can override the render style per controller type.
# For Microsoft controllers
GUIDEControllerRenderer.set_style(GUIDEControllerRenderer.ControllerType.MICROSOFT, \
    load("res://my_microsoft_controller_render_style.tres"))

# For Nintendo controllers
GUIDEControllerRenderer.set_style(GUIDEControllerRenderer.ControllerType.NINTENDO, \
    load("res://my_nintendo_controller_render_style.tres"))

# For Sony controllers
GUIDEControllerRenderer.set_style(GUIDEControllerRenderer.ControllerType.SONY, \
    load("res://my_sony_controller_render_style.tres"))

# For Steam Deck controller
GUIDEControllerRenderer.set_style(GUIDEControllerRenderer.ControllerType.STEAM_DECK, \
    load("res://my_steam_deck_controller_render_style.tres"))
Creating a custom renderer
Creating a custom renderer is a bit more involved, but it allows you total freedom over how your icon looks and how it is put together. You can find more details about creating a custom renderer in the Extending G.U.I.D.E section.