Configuring and input handling
Table of contents
Introduction
G.U.I.D.E provides a lot of functionality and for many projects only a limited subset is actually needed. If you just want a quick introduction on how to use it check out the quick start tutorial.
Actions
Actions are the main way in which our game code will interact with G.U.I.D.E. In contrast to Godot’s built-in input actions, G.U.I.D.E actions are resources of type GUIDEAction which we create as files in our project. To create an action, simply right-click in Godot’s file system explorer and then create a new resource:
Actions have quite a few properties which control how they work. We can edit the action’s properties by double-clicking them, then we can edit their properties in the inspector.
| Property | Description |
|---|---|
| Name | The name of the action. Is used when emitting the action as a Godot action and as a fallback when Display Name is not set. |
| Action Value Type | The value type associated with the action. This is the only required configuration property. |
| Block Lower Priority Actions | If set this action will block other actions that are lower priority and share the same input. See action input priority below. |
| Emit As Godot Actions | If checked whenever this action triggers, it will emit an InputEventAction into Godot`s input system. This is useful for interacting code that uses Godot actions (e.g. the UI). |
| Is Remappable | Marks the action as remappable. This allows remapping the action to new input at runtime. |
| Display Name | A display name to show the player for this action. Useful when creating UI for remapping input. |
| Display Category | A display category in which the action is located. Useful when creating UI for remapping input. |
Using actions in game code
Actions can be used in different ways in our game code. Before we can do that, we first need to get access to the action in our game code. The recommended way to do this is using an @export variable. This allows us to simply drag the action we want to access into the inspector.
@export var action:GUIDEAction
Because an action is a resource, we can also get access to it by using Godot’s load or preload functions:
var action:GUIDEAction = load("res://path/to/my_action.tres")
Note: If you use
preloadto load an action, make sure you usevarinstead ofconstfor declaring the variable to store the action.# This will not work const action:GUIDEAction = preload("res://path/to/my_action.tres") # This will work var action:GUIDEAction = preload("res://path/to/my_action.tres")This is a bug in Godot and there is currently no workaround for this.
We can now poll the action’s state in _process or _physics_process:
func _process(delta:float) -> void:
    if action.is_triggered():
        print("The action was triggered!")
Alternatively we can also get notified whenever the action changes its state. For this the action provides a range of signals.
func _ready():
    action.triggered.connect(_on_action_triggered)

func _on_action_triggered():
    print("The action was triggered")
We can use whichever way works best for our project. It is also possible to mix both ways. In addition to a state, each action also has a value. The type of value depends on the Action Value Type we have set up when creating the action. We can access the current value of the action using the value_xxx properties:
# For boolean actions (on/off)
var action_value:bool = action.value_bool

# For float actions (a single axis, e.g. joy trigger)
var action_value:float = action.value_axis_1d

# For vector2 actions (two axes, e.g. joy stick or mouse position)
var action_value:Vector2 = action.value_axis_2d

# For vector3 actions (three axes, e.g. 3D cursor)
var action_value:Vector3 = action.value_axis_3d
Note, that the value is independent of the state of an action. Even if an action is currently not triggered, it still has a value.
Mapping contexts
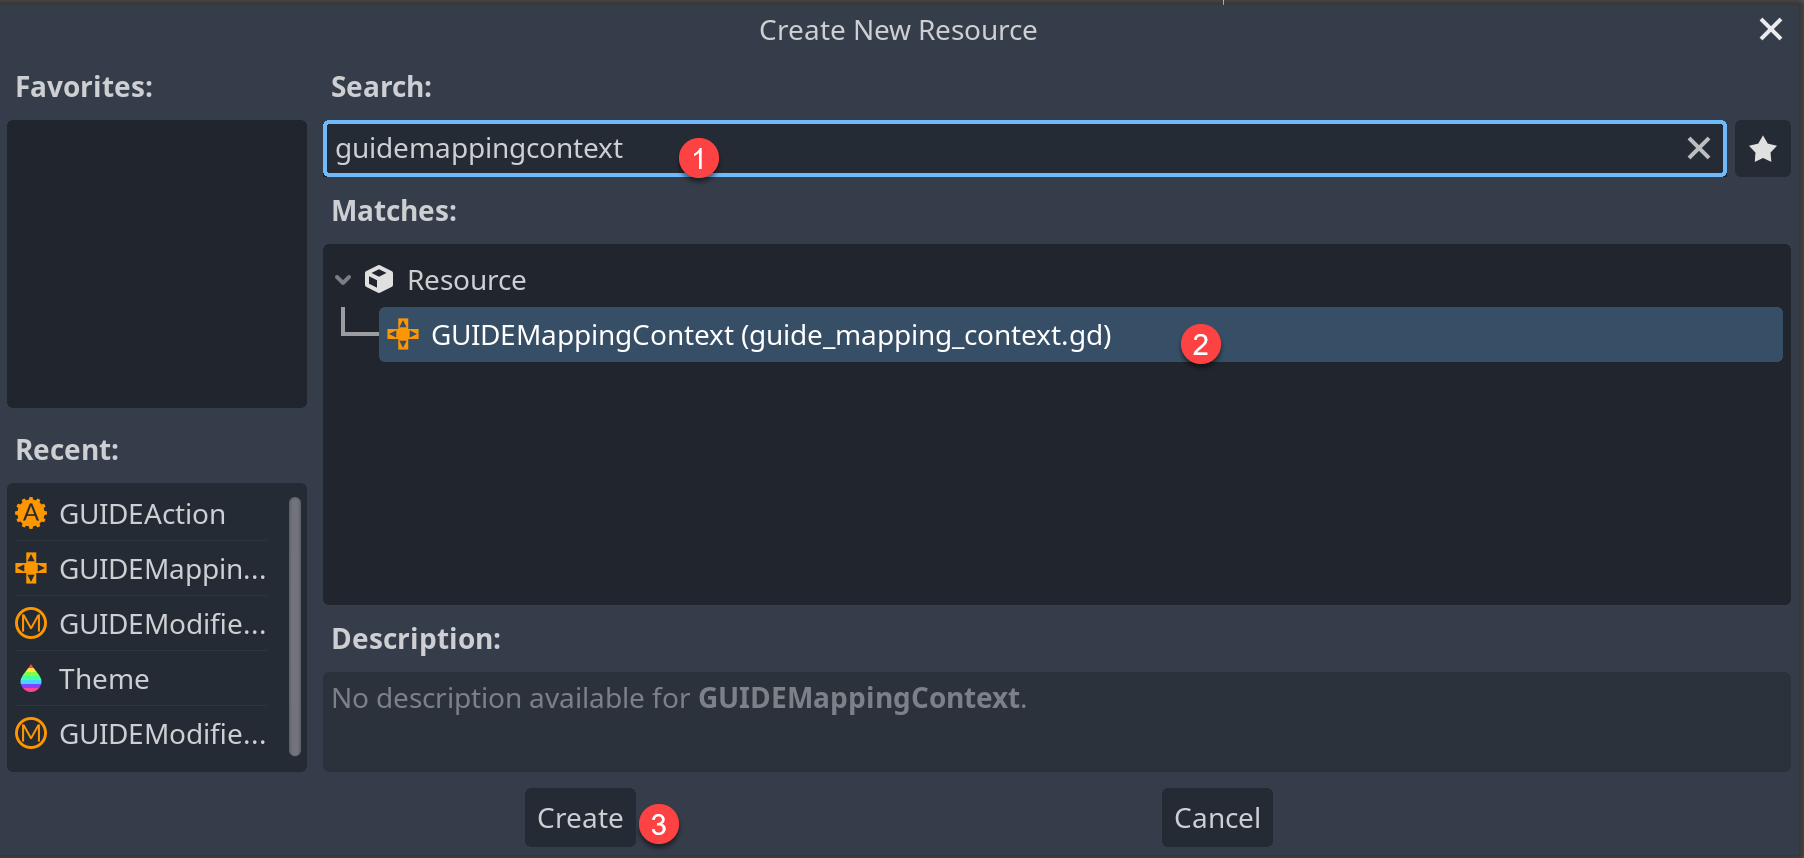
Mapping contexts allow us to assign input to actions. Like an action, a mapping context is also just a resource of type GUIDEMappingContext, so we can create one similar to how we create an action:
If we now double-click on the newly create mapping context, a custom editor will open and allow us to create bindings for our actions:
Creating action mappings
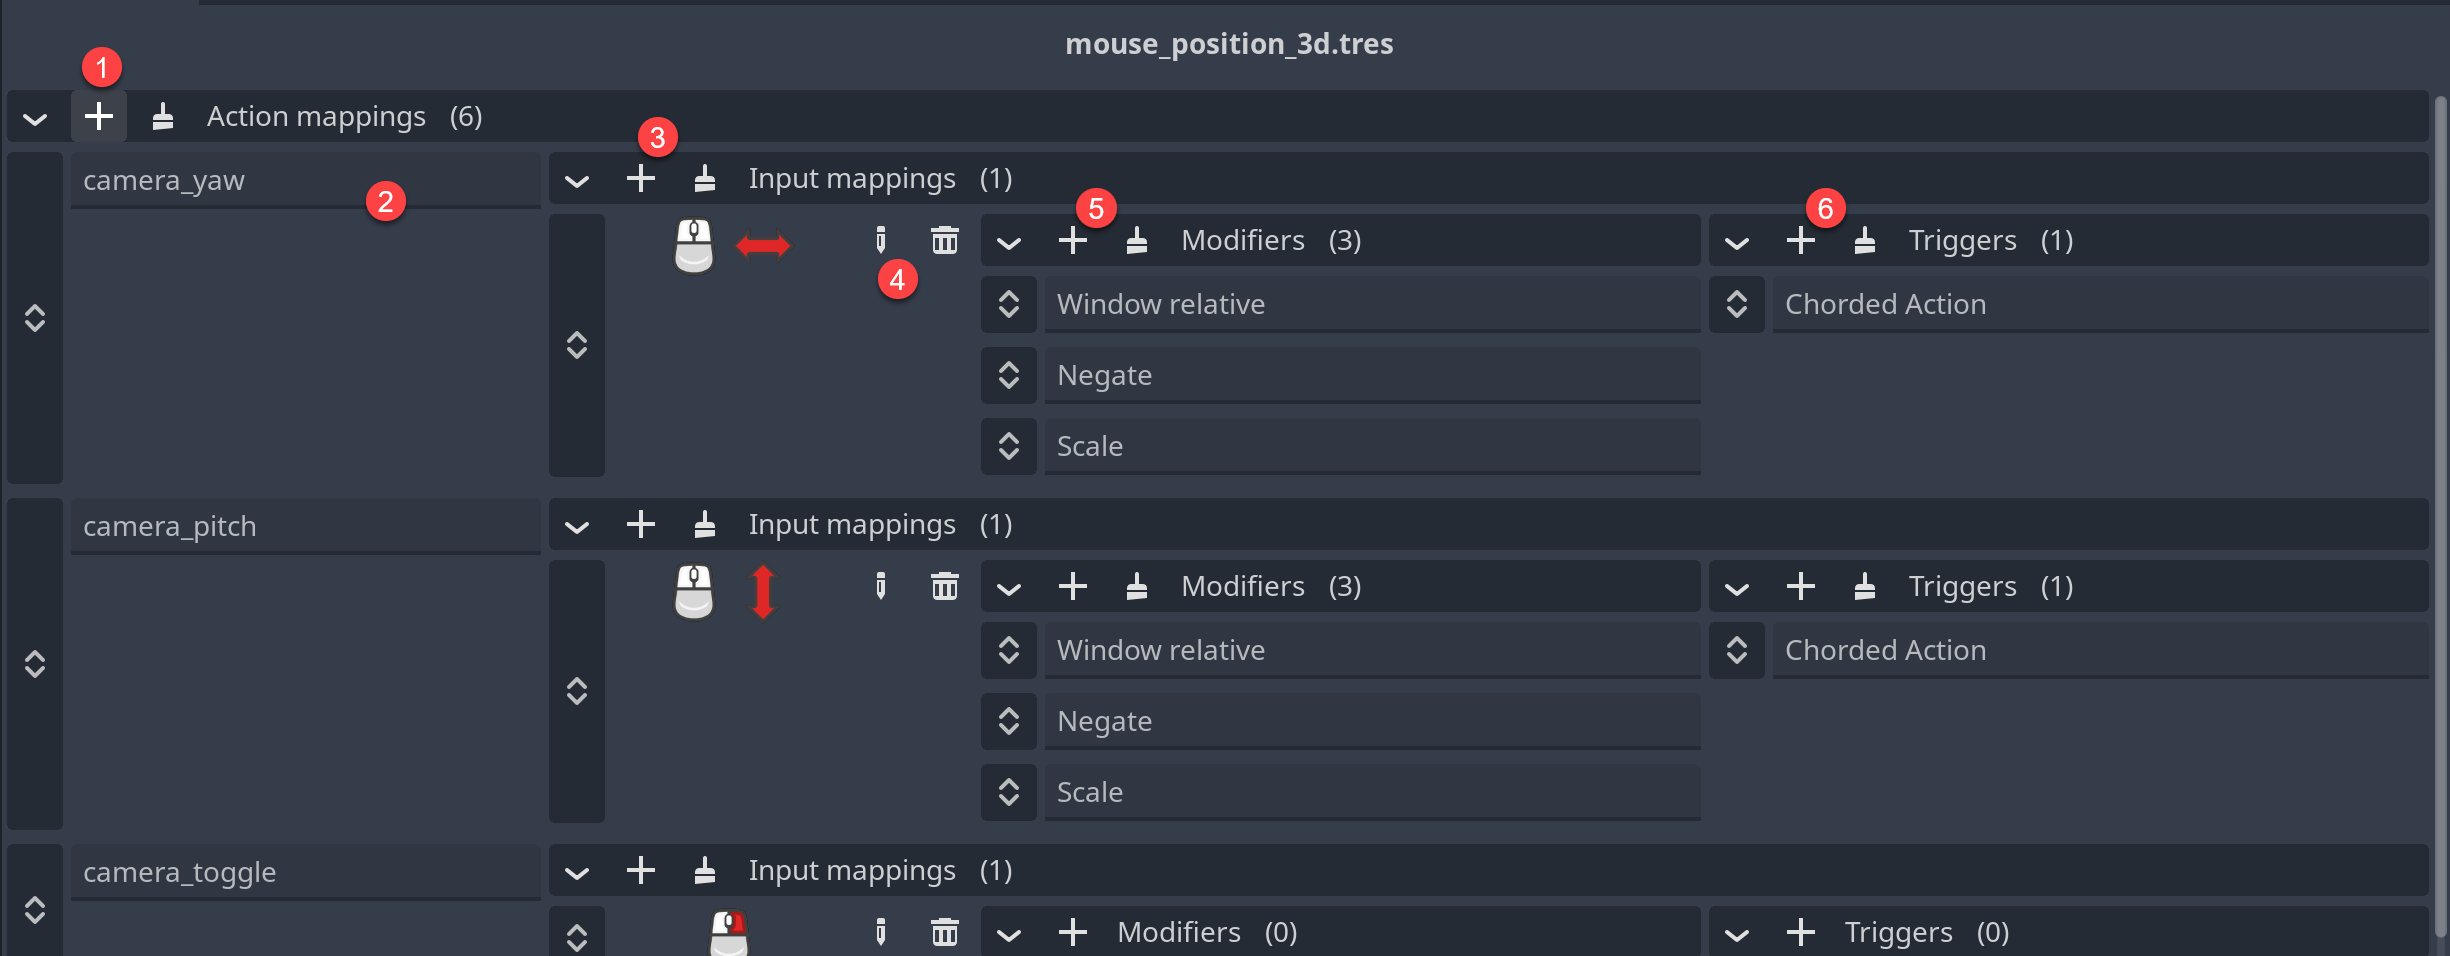
To create a new action mapping, press the + button (#1 in the image). This will create a new row for an action mapping. We start by dragging the action for which we want to create a binding into the action slot (#2 in the image):
Adding input mappings
Now we can create input mappings for our action. In the simplest case, an action is bound to a single piece of input (e.g. key on the keyboard, a button or a stick on the controller). To bind an input to our action, press the + button next to the Input Mappings list (#3 in the image). We can now bind an input to the action by clicking the pen icon (#4 in the image). The input dialog allows us to either detect an input or manually specify one:
Most of the time we want to use the input detection as it is the quickest way to select an input. However some inputs (like Action or Any) can only be selected manually on the right side of the dialog. Note, that the value type of the input doesn’t necessarily need to match the value type of our action as the action value is calculated from the inputs (see action value calculation below).
If we want to edit an input, we can either click the pen icon again and select a completely new input, or we can click on the input and then edit it in the inspector:
We can also bind more than one input to the same action. The values of all inputs bound to an action will be combined into the final action value (see action value calculation below).
Using actions as inputs
Sometimes it is useful to use the value of one action as input for another action. To do this, we can use the Action input type. This allows us to select another action as input for the current action. The value of the input action will be used as the value of the current action. We can find the Action input type on the right hand side of the input dialog in the 3D section. Once we have added the Action input, click it to show it in the inspector. Then we can drag the action that we want to use as input into the Action field.
Note that action values are calculated in the order in which the actions are defined in the mapping context. So usually we will want to define the action that is used as input before the action that uses it as input. This also means that if we have a circular dependency between actions, then one of the actions will be calculated with the value of the other action from the previous frame. This can lead to unexpected behavior, so it is usually a good idea to avoid circular dependencies between actions.
Adding modifiers
Modifiers allow us to modify the value of an input before this value is sent to triggers and eventually our game code. For example, we can use a modifier to invert the value of an axis or to scale it. To add a modifier, click the + button next to the Modifiers list (#5 in the image). We can now select a modifier from the list of available modifiers:
Many modifiers have settings that allow us to configure how the modifier works. To change the settings of a modifier, click on the modifier and then edit the settings in the inspector:
We can have multiple modifiers for a single input. The modifiers are applied in the order they are listed in the Modifiers list. We can drag modifiers to change their order:
Adding triggers
Triggers control whether an action is currently triggered. We can add triggers by clicking the + button next to the Triggers list (#6 in the image). We can now select a trigger from the list of available triggers:
Like inputs and modifiers, triggers can have settings that allow us to configure how the trigger works. To change the settings of a trigger, click on the trigger and then edit the settings in the inspector:
For the most part we will only ever use a single trigger per input mapping. However we can have multiple triggers for a single input mapping. If more than one trigger is defined for an input mapping, then at least one of the triggers must be active for the action to be triggered. The only exception to this rule is the Chorded action trigger. If we have one or more Chorded action triggers, then all of them must be active for the action to be triggered. If other triggers exist in addition to the Chorded action trigger, then at least one of them must be triggering as well. We can reorder triggers by dragging them in the Triggers list, however this currently has no effect on the behavior of the triggers, so this feature mostly exists so we can keep our triggers organized.
All triggers have a setting called Actuation Threshold. This setting determines at which value a trigger will deem the input to be actuated. The trigger will take the action value and compare it with the actuation treshold. If the action value is a vector, then the length of the vector will be compared with the threshold. The value of an action is calculated from its inputs and modifiers (see action value calculation below).
Copying modifiers and triggers
Sometimes it can be useful to copy a trigger or modifier to another input mapping. We can achieve this by just dragging the modifier or trigger between input mappings. This will create a copy of the modifier or trigger (unless it is shared, see next section). Note that a modifier or trigger slot must already exist in the target input mapping for this to work. If none is there, we can just create a dummy modifier or trigger and then overwrite it.
Sharing modifiers and triggers
Copying modifiers and triggers is useful when we need a quick copy to change some settings. However sometimes we don’t want a copy but rather a shared instance so we can make sure the settings are the same everywhere. We can achieve this by creating the modifier or trigger as a separate resource in the file system. Then we can drag this resource into the modifier or trigger slot of the input mapping. This will create a shared instance of the modifier or trigger. If we change the settings of the shared modifier or trigger, then all input mappings that use this shared modifier or trigger will be updated as well. The sharing is indicated by a different color in the slot.
Important: modifiers are stateless, while triggers are stateful. Because of this, G.U.I.D.E will create a duplicate of each trigger when enabling a mapping context. This is to ensure that the state of the trigger is not shared between different input mappings which would lead to unexpected behavior. This means when you change settings of a shared modifier through your game code (e.g. to enable/disable inversion of a stick) this will immediately work. However, if you change settings of a shared trigger through your game code (e.g. to change the actuation threshold or hold time) this will require that you disable and re-enable the mapping context to take effect.
Action value calculation
Each action can have multiple inputs assigned to it. This raises the question, how the final value of an action is calculated. The calculation is relatively simple:
- Each input is evaluated to get a value.
- All modifiers are applied to the value.
- The values of all inputs are added together to get the final value of the action.
For example, say we have a 2D axis action which is driven by 4 inputs, the W, A, S and D keys:

Each of these inputs is a GUIDEInputKey which will return a value of (1,0,0) if the key is pressed and (0,0,0) if the key is released. Say the player now presses the W and A keys at the same time. First the value of all inputs is calculated:
- W:
- is pressed so we get
(1,0,0) - has a Negate modifier which inverts the value to
(-1,0,0) - has an Input Swizzle modifier which swaps the X and Y components, so the final value is
(0,-1,0)
- is pressed so we get
- A:
- is pressed so we get
(1,0,0) - has a Negate modifier which inverts the value to
(-1,0,0)
- is pressed so we get
- S:
- is not pressed so we get
(0,0,0)
- is not pressed so we get
- D:
- is not pressed so we get
(0,0,0)
- is not pressed so we get
Finally all four values are added together to get the final value of the action:
(0,-1,0) + (-1,0,0) + (0,0,0) + (0,0,0) = (-1,-1,0)
So the final value of the action is (-1,-1,0). Because the action is set to be a 2D axis, the final value only contains the X and Y components. The Z component is ignored.
Using mapping contexts in the game
Enabling and disabling mapping contexts
We can define multiple mapping contexts for our game, and we can enable and disable them through code while our game is running. This allows us to easily implement a few things which are rather difficult to do with Godot’s built-in input system.
- We can have contextual input depending on the player situation. E.g. the same controls that move the player left and right when the player is on foot, can control the steering of a car when the player is in a car.
- We can quickly disable all input when we show a menu or a cutscene.
- We can have different control schemes for different input devices (e.g keyboard and mouse vs. controller) and switch them dynamically when a certain input is actuated.
Mapping contexts are enabled and disabled with the GUIDE autoload.
@export var my_mapping_context:GUIDEMappingContext

func _ready():
    GUIDE.enable_mapping_context(my_mapping_context)

func _disable_controls():
    GUIDE.disable_mapping_context(my_mapping_context)
The enable_mapping_context function also has a second boolean parameter disable_others which can be used to disable all currently active mapping contexts when enabling another. This can be useful in a variety of situations, for example when we want to switch to a different input scheme or when we want to disable all input while showing a menu. The default value for disable_others is false.
# Enable the mapping context and disable all other mapping contexts
GUIDE.enable_mapping_context(my_mapping_context, true)
Mapping contexts also provide an enabled and disabled signal which can be used to get notified when a mapping context is enabled or disabled. This can be useful for triggering additional actions when a mapping context becomes active or inactive. For example we can show or hide certain UI elements depending on the currently active mapping context.
@export var my_mapping_context:GUIDEMappingContext

func _ready():
    my_mapping_context.enabled.connect(_on_mapping_context_enabled)
    my_mapping_context.disabled.connect(_on_mapping_context_disabled)

func _on_mapping_context_enabled():
    # Show some UI elements
    ...

func _on_mapping_context_disabled():
    # Hide some UI elements
    ...
Mapping context action priority
We can enable multiple mapping contexts at the same time. But what happens, if the same action is configured in multiple mapping contexts and these mapping contexts are all active? GUIDE allows us to specify a priority when activating a mapping context. The default priority is 0, but we can set it to any integer value:
GUIDE.enable_mapping_context(my_mapping_context, false, -10)
Lower values have higher priority. When multiple mapping contexts define mappings for the same action, GUIDE will merge the inputs from all active contexts together. This allows different contexts to contribute different inputs to the same action. For example, we could have a keyboard/mouse context that binds WASD to a “move” action, and a controller context that binds the left joystick to the same “move” action. When both contexts are enabled, the player can use either WASD or the joystick to move.
If mapping contexts have the same priority, the order is determined by when they were enabled - more recently enabled contexts take precedence. This is particularly useful when merging inputs, as it allows a later-enabled context to override specific inputs from an earlier context while still preserving other inputs.
When merging inputs, GUIDE ensures that only one mapping exists for each input-action pair. If multiple contexts try to bind the same input to the same action, only the binding from the highest priority context is used. For contexts with the same priority, the more recently enabled context’s binding takes precedence. For example, if both a keyboard context and a controller context try to bind the “A” button to a “jump” action, only one of those bindings will be active - the one from whichever context has higher priority (or was enabled more recently if they have the same priority).
Note that input merging happens automatically when multiple contexts are enabled. If you want to completely replace all active mappings instead of merging them (for example, when switching from walking controls to flying controls), you can set the disable_others parameter to true when calling enable_mapping_context(). This will disable all previously active contexts before enabling the new one, saving you from having to manually call disable_mapping_context() for each active context.
Action input priority
An action can set the Block Lower Priority Actions property. If this property is set, then triggering this action will block all other actions that are lower priority and share the same input. Action priority is determined by their position within the mapping context, so actions higher up in the list have higher priority. This behaviour is usually used in conjunction with the Chorded action trigger to allow multiple actions to be triggered by the same input, based on whether a modifier key is pressed or not. For example on controllers, the D-pad can do different things depending on whether the left trigger is held or not. This could look like this in the mapping context editor:
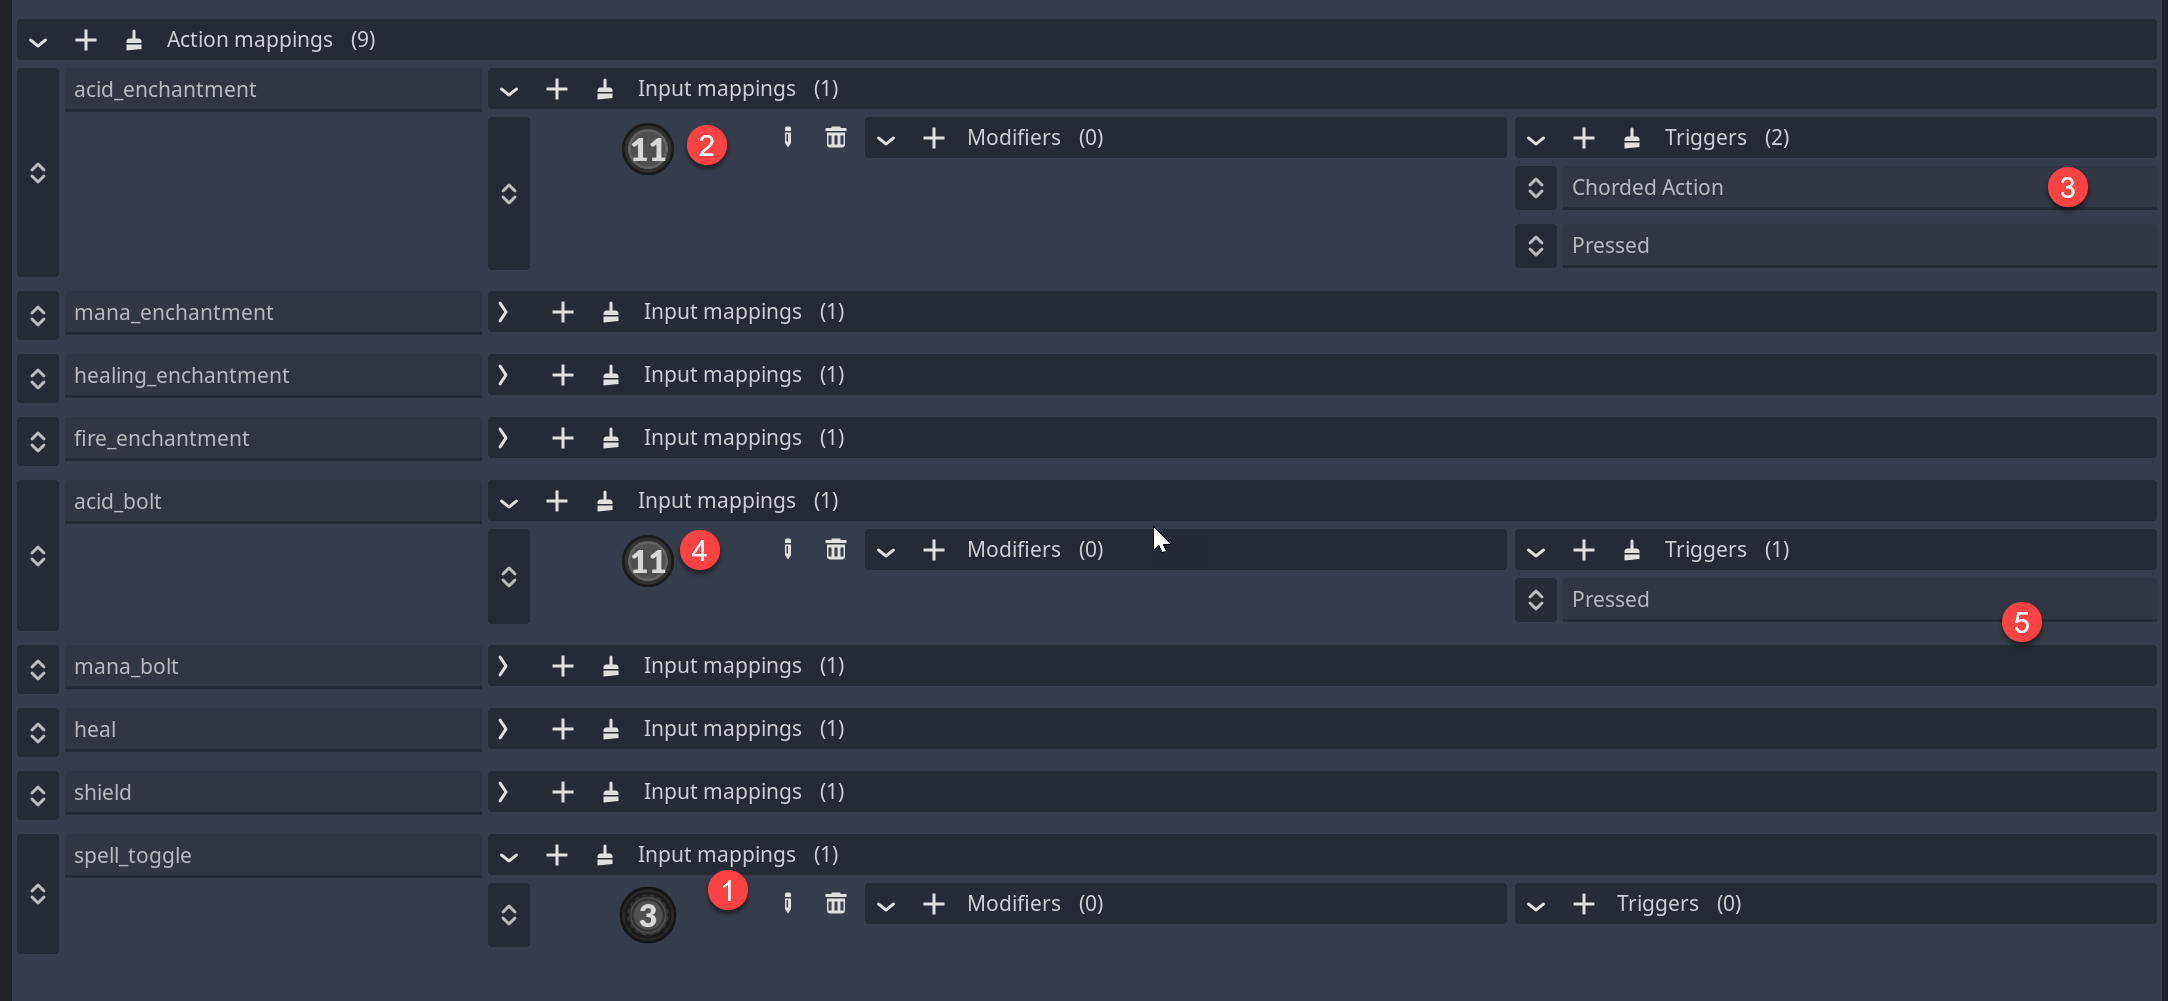
Here we have a modifier action named spell_toggle that is bound to the left trigger (Axis 3 in Godot, #1 in the image). Now we have two other actions acid_enchantment and acid_bolt (#2 and #4 in the image) which are both bound to D-pad up. In addition to the D-pad up input, acid_enchantment is also bound to the spell_toggle action with a Chorded action trigger (#3 in the image). This means that acid_enchantment will only trigger if the left trigger is held down and the D-pad up button is pressed. However acid_bolt will trigger every time if the D-pad up button is pressed regardless of the state of the left trigger (#5 in the image). Therefore the acid_enchantment action has the Block Lower Priority Actions property set to true and has been given a higher priority than the acid_bolt action. This way, when acid_enchantment is triggered, acid_bolt cannot be triggered at the same time because both actions share the same input and acid_enchantment has a higher priority.
The G.U.I.D.E debugger
When designing input, it is often very useful to see what is happening with the input in real time. The G.U.I.D.E debugger allows us to see the current state of all actions and their inputs, so we can quickly see if our input is set up correctly. It also shows the calculated priorities when actions have overlapping input.
The G.U.I.D.E debugger is a separate scene that we can add to our game. It is recommended to put it into a separate canvas layer, but because it is a GUI control node, we could also embed it into a custom debugging UI. The debugger is a full scene, not just a single node so we need to use the Instance Child Scene option in the editor to add it to our scene:
The debugger will automatically update as mapping contexts get enabled or disabled, so all we have to do is to add it to our game, and it should work without any additional configuration.